Under-Extrusion in 3D Printing: Causes, Diagnosis and Fixes
By Chris Avery, Publisher / Editor
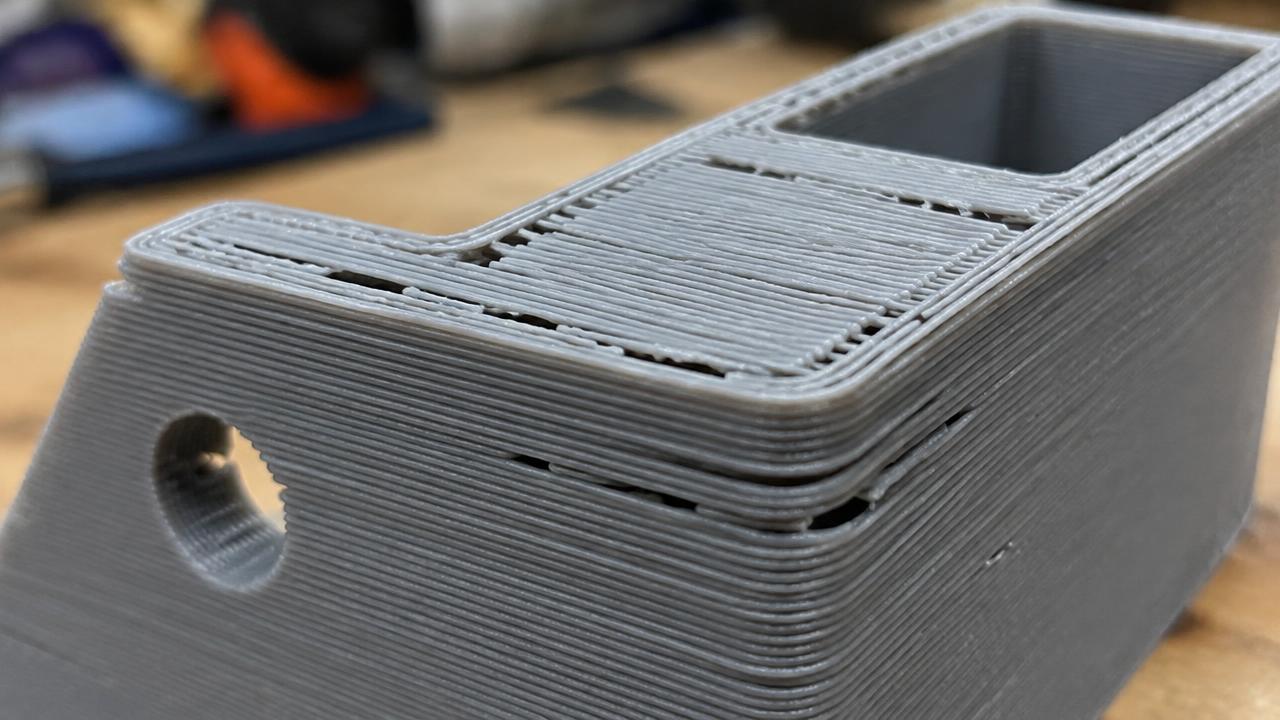
Gaps between lines, thin walls and missing sections all mean the same basic thing: less plastic is coming out of the nozzle than your slicer asked for. This guide explains why that happens and how to narrow down the cause without taking your printer apart unnecessarily.
Quick Answer
Gaps, thin walls and missing lines are signs of under-extrusion: the nozzle is delivering less plastic than expected. The usual causes are a partial clog, printing too fast for the hotend to melt filament, temperature too low, a slipping extruder, resistance in the filament path, wet filament, or wrong slicer flow and diameter settings. Check the simple things first — slicer settings, spool path, speed — before taking hardware apart.
TL;DR — Quick Summary
Under-Extrusion at a Glance
- 1What it is: Less plastic leaves the nozzle than the slicer planned
- 2Check first: Slicer diameter/flow, spool path, print speed
- 3Fast sections only?: Likely a volumetric-flow (melt-rate) limit
- 4Worse over time?: Think heat creep, a developing clog or spool drag
- 5Still unsure?: Use the free 3D Print Problem Troubleshooter (linked below)
What Is Under-Extrusion?
An FDM printer builds a part by laying down thin lines of melted plastic. For every move, your slicer calculates how much filament needs to be pushed into the hot end so that the line comes out at the planned width and height. Under-extrusion is simply what happens when the amount that actually comes out is smaller than that plan.
The printer doesn't know this is happening. It keeps moving as if every line were full width, so the shortfall becomes visible as gaps, thin walls or weak bonds between layers. That is why under-extrusion is best thought of as a symptom rather than a single problem: anything that restricts, slows or miscounts the flow of plastic can produce it.
What is Under-extrusion?
Under-extrusion A condition in FDM 3D printing where the nozzle deposits less plastic than the slicer intended, producing gaps between lines, thin or incomplete walls, missing line segments and weak layer bonding.
What Does Under-Extrusion Look Like?
The signs range from subtle to obvious. The most common ones are:
- Gaps between extrusion lines. On top surfaces and in solid infill, you can see daylight or the infill pattern between lines that should be touching.
- Thin or incomplete walls. Perimeters look narrow, slightly translucent, or have small holes where the inner and outer walls don't fuse.
- Weak layers. Thin lines have less contact area with the layer below, so parts can snap or peel along layer lines with little force.
- Inconsistent extrusion. Some lines look normal while others look stringy or thin, sometimes changing within a single layer.
- Missing sections of lines. Short segments simply aren't there, often right after a travel move or retraction.
- Symptoms that get worse during a print. The bottom of the part looks fine, but the problem appears or grows as printing goes on.
When and where the symptom appears is often more useful than how it looks. A problem that affects every layer points in a different direction from one that only appears on fast infill, which points elsewhere again from one that starts an hour into the print.
How Is Under-Extrusion Different From Other Print Defects?
Several problems look similar at a glance. A few quick ways to tell them apart:
- Over-extrusion is the opposite — too much plastic. You see blobs, bulging walls, rough top surfaces and parts that are slightly oversized.
- Rough or bumpy surfaces can come from either over- or under-extrusion, wet filament or temperature. If your main complaint is texture rather than gaps, our guide to why 3D prints come out rough covers that broader picture.
- A bad first layer with gaps is very often a Z-offset issue — the nozzle is too far from the bed — rather than true under-extrusion. If only the first layer is affected, check bed leveling and Z-offset first.
- Layer shifts move whole layers sideways. That's a motion problem (belts, stepper motors), not a flow problem.
- Pillowing (bumpy, sunken top surfaces) is often caused by too few top layers or insufficient cooling, though under-extrusion can make it worse.
Symptom → Likely Cause → What to Check → Fix
Use this table to decide where to look first. These are diagnostic clues, not proof: one symptom can have several causes, and more than one cause can be present at the same time.
| Symptom | Likely cause(s) | What to check | Fix |
|---|---|---|---|
| Under-extrusion through the entire print, at every speed | Partial clog, flow/extrusion multiplier set too low, wrong filament diameter in the slicer, temperature too low | Slicer filament diameter (1.75 vs 2.85 mm) and flow setting; manual extrusion test with the nozzle hot | Correct slicer settings; clear the nozzle; raise temperature within the filament maker's range |
| Gaps appear mainly in fast sections (infill, long straight walls) | Required volumetric flow exceeds what the hotend can melt | Calculate flow for that section; reprint with the speed reduced | Lower speed or layer height, or set a max volumetric speed in the slicer |
| Random under-extruded layers or bands | Spool snagging, tangled filament, intermittent partial clog, extruder gear slipping | Watch the spool during a print; look for filament grinding dust at the gear | Free the spool path; clean the drive gear; adjust tension |
| Extrusion gets worse as the print continues | Heat creep, a clog building up, spool tension rising as it empties | Check the hotend cooling fan is spinning; note whether the problem starts after a similar time each print | Fix hotend cooling; clean the nozzle; reduce spool drag |
| Clicking or skipping extruder | Back-pressure from a clog, speed too high, temperature too low, extruder tension wrong | Does the clicking stop when you slow down or raise temperature? | Address the cause of resistance first, then set tension so the gear grips without crushing |
| Inconsistent lines after the filament was stored openly | Moisture absorption | Listen for popping or hissing; look for bubbles or rough, fuzzy surfaces | Dry the spool following the manufacturer's guidance; store it sealed |
| First layer looks normal, upper layers become thin | Faster speeds above the first layer, heat creep, slipping extruder | Compare first-layer speed to later speeds in the slicer | Reduce speed or flow demand above the first layer; check cooling and tension |
| Only certain filament types have the problem | Temperature too low for that material, material-specific friction (e.g. flexible filament), diameter variation on that spool | Compare your temperature to the manufacturer's range; measure diameter at a few points | Use that material's recommended settings; slow down for flexible filament |
What Causes Under-Extrusion?
Every cause below reduces flow in one of three ways: it restricts the path the plastic travels, it stops the filament being pushed reliably, or it makes the slicer miscalculate how much to push. Knowing which group a cause belongs to makes it easier to test.
Is a partial nozzle clog restricting flow?
A full clog stops extrusion entirely and is easy to spot. A partial clog is sneakier: a bit of burnt plastic, dust or a particle from the filament narrows the opening, so the extruder has to push harder to get the same amount through. Often it can't, and the result is thin lines across the whole print or intermittently. A good test is to heat the nozzle and extrude a short length by hand from the printer menu — a healthy nozzle produces a smooth, straight strand that falls down; a partially clogged one tends to curl sharply to one side, come out thin, or sputter.
Is the printing temperature too low?
Colder plastic is thicker and harder to push. If the nozzle is at the bottom of — or below — the filament's recommended range, the hot end may not melt filament fast enough, and the extruder meets more resistance. This often appears together with weak layer bonding. Filament makers print a recommended range on the spool or in their data sheet; start there, and see our 3D printing temperature guide for how to find a good value within that range.
Are you printing too fast?
Speed itself doesn't cause under-extrusion; the amount of plastic the speed demands does. At a higher speed, the hot end has less time to melt each millimeter of filament. Past a certain point it can't keep up. This is the most common reason gaps appear only on fast infill or long straight walls, and it's explained in detail in the volumetric flow section below.
Is the extruder tension wrong?
Most extruders squeeze the filament between a drive gear and an idler, adjusted by a spring or screw. Too little tension and the gear slips over the filament instead of pushing it. Too much and the gear can deform soft filament, digging a groove until it loses grip, or flatten it enough to add friction further down the path. Your printer or extruder manufacturer usually documents a recommended setting.
Is the extruder gear slipping or grinding?
When something downstream resists — a clog, cold nozzle or excessive speed — the gear can't advance the filament, so it spins against it. You'll often hear a rhythmic clicking and find fine plastic dust or a chewed section on the filament. Slipping is usually a result of resistance elsewhere, so treat it as a clue rather than the root cause. Teeth clogged with plastic dust can also lose grip on their own; cleaning them with a small brush can help.
Is there resistance in the filament path?
Between the spool and the nozzle, filament can rub against guides, sharp bends, a filament sensor or the entry of the extruder. Each bit of drag uses up some of the extruder's pushing force. You can feel this by pulling filament through the path by hand with the extruder tension released: it should slide smoothly with gentle effort.
Is the spool feeding freely?
A spool that binds on its holder, a crossed-over winding or a tangle can suddenly stop filament feeding, creating random bands of under-extrusion or a complete stop. Spool drag can also rise as the spool empties, because the extruder has to pull a smaller-diameter coil that's harder to rotate on some holders. Watching the spool for a few minutes during a print tells you a lot.
Is the Bowden tube causing problems?
On printers with a Bowden setup (the extruder is mounted on the frame and pushes filament through a PTFE tube), a tube that has slipped out of its fitting can leave a gap at the hot end where molten plastic collects and partially blocks flow. Worn fittings, tight bends and a damaged tube end can also add friction. This doesn't apply to direct-drive printers, where the extruder sits on the toolhead.
Is the flow rate or extrusion multiplier set too low?
The slicer's flow (also called extrusion multiplier) scales how much filament is pushed for every move. A value below what your setup needs produces consistent under-extrusion on every layer. Some printer profiles and filament profiles stack two flow settings, so check both. Flow calibration should come after the mechanical and thermal checks: raising flow to cover a clog or speed limit only masks the real problem.
Is the filament diameter setting correct?
Slicers calculate extrusion volume from the filament diameter you enter. If a printer that uses 1.75 mm filament is set to 2.85 mm, or vice versa, extrusion will be dramatically wrong. It's a rare mistake on a stock profile but common after importing settings or switching printers. Filament that is consistently thinner than its labeled diameter will also under-extrude slightly, which is why diameter tolerance matters.
Is the filament wet or degraded?
Many filaments absorb moisture from the air. When wet filament hits the hot end, the water turns to steam, which can cause popping, bubbles and voids that look like inconsistent extrusion. Old or heat-damaged filament can also become brittle and snap in the path. If extrusion became inconsistent after a spool sat out for weeks, drying is a reasonable step; our filament dryer guide explains the options. Follow the filament maker's drying temperature and time — they differ by material.
Filament quality can matter here too. Spools with loose diameter tolerance or inconsistent material can cause flow to drift along the roll. When you've ruled out the printer and settings, printing the same file with a spool from a manufacturer that publishes its tolerances and recommended settings — for example, a spool from Polymaker's filament store (affiliate link) — can act as a control: if the problem disappears, the original spool was a factor; if it doesn't, keep looking at the printer.
Are worn or damaged components involved?
Nozzles wear over time, especially with abrasive filaments such as carbon-fiber or glow-in-the-dark blends, which can change how plastic flows. Drive gears wear smooth, PTFE liners degrade, and thermistors or heater cartridges can fail or come loose, giving incorrect temperatures. These are usually the last things to suspect, after simpler checks.
Could heat creep be the cause?
Heat creep happens when heat travels up from the hot end into the area where filament should still be solid. The filament softens too early, swells and jams, causing extrusion to fade or stop — typically after the printer has been running for a while. A failed or clogged hotend cooling fan, a very warm enclosure, or very slow printing with low-temperature materials like PLA can contribute. If extrusion fades mid-print and recovers after cooling down, heat creep is worth investigating.
What Is Volumetric Flow and Why Does It Matter?
Think of your hot end like a kettle with a fixed-size heating element. It can melt only so much plastic per second. If you ask for more than that, you don't get faster printing — you get plastic that isn't fully melted, more resistance at the nozzle, and less material coming out.
That amount is called volumetric flow, usually measured in cubic millimeters per second (mm³/s). The flow a line needs can be estimated with a simple formula:
volumetric flow (mm³/s) ≈ layer height (mm) × line width (mm) × print speed (mm/s)
Multiplying millimeters by millimeters by millimeters-per-second gives cubic millimeters per second — the volume of plastic the hot end must deliver every second.
Illustrative examples
The numbers below are worked arithmetic examples, not measurements from any specific printer:
- 0.2 mm layer × 0.45 mm line × 50 mm/s ≈ 4.5 mm³/s
- 0.2 mm layer × 0.45 mm line × 150 mm/s ≈ 13.5 mm³/s
- 0.3 mm layer × 0.5 mm line × 150 mm/s ≈ 22.5 mm³/s
The same printer that handles the first case easily may not be able to deliver the third. Hot end capacity depends on its design, the nozzle size, the temperature and the filament, so check your printer or hot end manufacturer's specification where one is published, and treat it as an upper bound rather than a target.
This explains a very common pattern: walls printed slowly look perfect, while infill — which slicers often print faster and sometimes with thicker lines — shows gaps. The slicer's speed setting may also be capped by acceleration on short moves, so the problem often appears only on long, straight sections where the printer actually reaches full speed. Many slicers let you set a maximum volumetric speed so they automatically slow down when a move would exceed it. If you print fast regularly, our guide to PLA for high-speed printing covers which materials are designed for higher flow.
Diagnostic Decision Tree
Work down this sequence in order. Each step is ordered so that the easiest and least invasive checks come before ones that require heating, disassembly or replacement parts.
Is it only the first layer?
Yes → check Z-offset and bed leveling before anything else. No → continue.
Are the slicer's filament diameter and flow values correct?
No → fix them and reprint. Yes → continue.
Is the spool turning freely and the filament untangled?
No → free the spool and path. Yes → continue.
Does slowing the print down make the problem go away?
Yes → likely a volumetric-flow limit; reduce speed, layer height or set a max volumetric speed. No → continue.
Is the temperature within the filament maker's range?
No or at the very bottom → raise it in small steps and retest. Yes → continue.
Is the extruder clicking, or is there ground plastic at the gear?
Yes → something is resisting flow; check for a partial clog and correct tension. No → continue.
Does a manual extrusion produce a smooth, straight strand?
No → partial clog likely; clean or replace the nozzle. Yes → continue.
Does the problem get worse the longer the print runs?
Yes → check the hotend cooling fan for heat creep and watch spool drag. No → continue.
Has the spool been stored openly, or does it pop or hiss?
Yes → dry it and retest. No → continue.
Do settings and hardware check out?
Yes → fine-tune flow calibration, and try a known-good spool as a control.
Still can't tell what's causing it?
The free 3D Print Problem Troubleshooter asks a few questions about your symptom, material and printer setup, then lists the most likely causes and checks in order. It runs entirely in your browser and doesn't guarantee a diagnosis — it helps you decide what to check next.
In What Order Should You Troubleshoot Under-Extrusion?
Change one thing at a time and reprint a small test piece after each change. Changing several settings at once makes it impossible to know which one helped.
1. Quick checks (no tools, printer cold or idle)
- Confirm the slicer's filament diameter matches your filament.
- Check the spool turns freely and the filament isn't crossed or tangled.
- Look at the path from the spool to the extruder for sharp bends or snags.
- Check whether the problem appears everywhere or only on certain features.
2. Settings checks
- Compare nozzle temperature to the filament maker's recommended range.
- Reduce print speed, especially infill speed, and reprint the same test.
- Calculate the volumetric flow of your fastest feature using the formula above.
- Check flow / extrusion multiplier in both printer and filament profiles.
3. Filament checks
- Dry the spool if it's been exposed, following the manufacturer's guidance.
- Measure the diameter at a few points along the filament with calipers.
- Look for brittleness, kinks or chewed sections.
- Try a different, known-good spool as a comparison.
4. Hardware checks
- Heat the nozzle and extrude manually to look for a partial clog.
- Check extruder tension against the manufacturer's recommendation.
- Clean filament dust from the drive gear teeth.
- Check that the hotend cooling fan spins whenever the hot end is warm.
- On Bowden printers, check the tube is fully seated at both ends.
- Only then consider replacing the nozzle or other worn parts.
Safety: nozzles and heater blocks reach well over 200°C and stay hot for a while after the printer is switched off. Don't touch them, and use the tools your printer's manufacturer recommends. Many manufacturers advise removing or tightening a nozzle only with the hot end at temperature, which needs extra care. Keep hands clear of moving axes and belts while the printer is powered, and switch off and unplug the printer before working on wiring, fans or internal components.
How Can You Prevent Under-Extrusion?
- Store filament sealed with desiccant when it's not in use.
- Keep the spool holder smooth and the filament path free of tight bends.
- Use the filament maker's published temperature range as your starting point.
- Set a maximum volumetric speed in your slicer that suits your hot end.
- Check that the hotend cooling fan runs freely and keep it clear of dust.
- Clean the extruder drive gear periodically.
- Inspect nozzles more often if you print abrasive materials.
- Recalibrate flow when you change filament brand or type.
- Keep a note of settings that work for each spool.
Frequently Asked Questions
What does under-extrusion look like?
Under-extrusion usually shows up as gaps between extrusion lines, thin or see-through walls, top surfaces with visible holes, missing segments of lines, and layers that separate easily. It can affect a whole print or appear only in certain layers or fast sections.
Can a partial clog cause under-extrusion without stopping the print?
Yes. A partial clog narrows the path plastic can flow through, so the printer keeps extruding but delivers less material than the slicer expects. Prints often continue with thin, weak or gappy lines rather than failing outright.
Why does under-extrusion only happen when the printer moves fast?
Faster moves require more plastic per second. Every hotend has a limit on how much filament it can melt per second, known as volumetric flow. When a fast infill or wall section asks for more than that limit, extrusion falls short even though slower sections look normal.
Can wet filament cause under-extrusion?
It can contribute. Moisture turns to steam in the hot end, which can cause popping, bubbles, voids and inconsistent flow. Drying the filament according to the manufacturer's guidance is a sensible check when extrusion becomes inconsistent after a spool has been stored openly.
Should I increase the flow rate to fix under-extrusion?
Only after ruling out mechanical and thermal causes. Raising flow can hide a clog, a slipping extruder or a speed limit temporarily, but it does not fix them. Flow calibration is a final fine-tuning step, not a first fix.
Why is my first layer fine but upper layers are thin?
The first layer is usually printed slowly and squished into the bed, which can mask a flow problem. If upper layers become thin, likely suspects include higher print speeds exceeding hotend capacity, heat creep developing over time, a slipping extruder, or spool tension increasing as the spool empties.
Final Thoughts
Under-extrusion is rarely mysterious once you look at when it happens. Problems on every layer usually point to settings or a restriction; problems on fast features point to flow limits; problems that grow during a print point to heat creep, a developing clog or spool drag. Work through the cheap, quick checks first, change one thing at a time, and save flow calibration for last.